
I started with a wall made of 3/8" plywood (obviously this isn't a scale model, per se, because the wall isn't thick enough for scale :) I painted it white.
The surface is okay, but clearly shows the typical plywood grain and has a few large knots and gaps in it. So the first thing I do, partly to fill in the obvious plywood gaps and partly to give it the texture of old plaster, is to roughly apply a partial coat of some kind of crack filler. (I'm not worrying about the area right around the door in this example, because I'm going to cover the bit of pink tape and the error in cutting with some framing for the doorway :)

In Canada we have various brands of Poly Filla available -- I've used all different kinds. This one is designed to fill bigger gaps so is more fibrous.
I applied it with a scrap of plastic, because I prefer a fairly flexible applicator for walls.

Okay, now you can apply your colour washes -- these would go for walls, chimney breasts or anything you want to keep fairly "whiteish" but want to look aged or rustic.
You need to do at least two washes, one "cool", one "warm". Maybe start with a grey -- a little white, a tiny amount of black (very little black) and a lot of water. You want a nice, neutral, super watery grey. (I use artist's acrylics because that's what I have, but any water soluble craft paint would be fine).

Test your solution in an inconspicuous part of the model. It should change the colour, but not be really, really obvious. You'll notice it, but it shouldn't look too opaque.

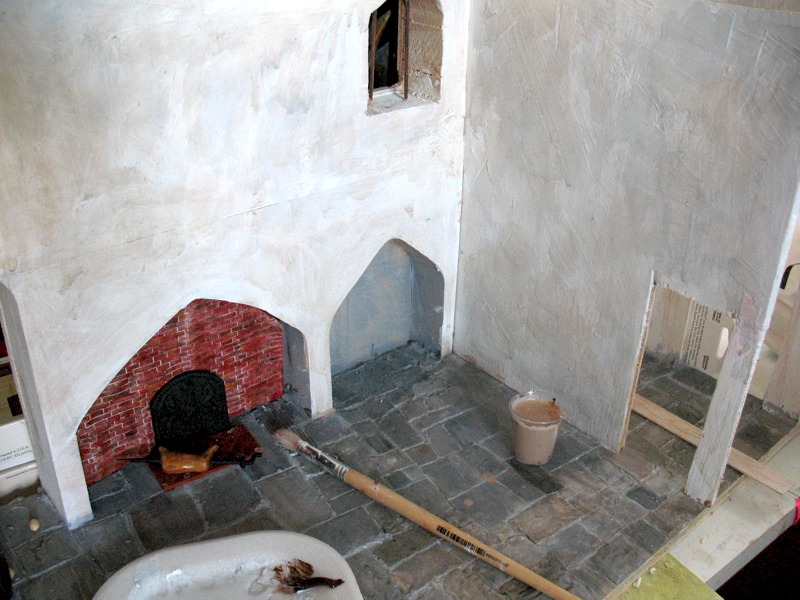
If it's too heavy (as it clearly is in the photo above), immediately dilute it on the wall with a clean brush and more water.

That's better!
When you've got the solution to your liking, roughly brush some on all the parts you want to age. You do not want to cover all the white, just scumble the wash on a bit, stand back and look at it. Don't use a tiny brush -- a good half an inch diameter round brush would be perfect.


It looks okay, but it's a little flat. Now mix up your second wash. This should be a warm one. It's the balance of warm and cool that really makes things look three dimensional. For the second wash here, I just added a little burnt umber to the very watery grey wash. It's fine to work wet into wet, by the way.

Step back from the project often. Breathe. Have a cup of tea (or a gin and tonic). Come back and just let your eye wander over the work. You'll know when it's right!
Most of all, have fun :) Remember, if it really looks dreadful, just paint it over white and start again!


.JPG)


We are doing about the same thing :). 2 weekends ago, I plastered the weatherboards of a farmhouse hoping to convert it into a tribal mudhouse :). Since then Ihave been trying to age the windows and door. LOL. I like how you "plastered" the walls.
ReplyDeleteThat's funny, Sans!
ReplyDeleteI just got back from checking out your site(s). You have so much going on, so much information, I'm impressed and overwhelmed! What an amazing project. Thank you so much for commenting!
What a great tutorial and excellent pictures. It all makes more sense with pictures! It's very effective.
ReplyDeleteBrilliant tutorial, thank you :) The kitchen is really coming on nicely, you work so fast!
ReplyDeleteThanks so much, Irene and MB -- I really appreciate your comments :)
ReplyDeleteThat's a great tutorial :) And about the chandlier, I don't know if I want to give the link to you as then you go and buy it and I'll be green with envy... :D http://www.minst.com/eu/index2.htm She has the most fab stuff there :)
ReplyDeleteIra
Ira, that's a very beautiful chandelier. It's safe, though, because it's too late for my houses (and I don't happen to have 110 euros :)
ReplyDeleteI do covet the shell bowl, though (which looks delightfully Renaissance) and she actually sells all the bits and pieces to make chandeliers!
I know, I've been looking at those and actually collecting bits and pieces so I could do my own chandeliers. Which is going to be probably an experience from hell :D
ReplyDeleteThat's tremendously amusing, Ira, because I really want to build some light fixtures, and I've got all sorts of things to do it, too. And I have done nothing ... :) Maybe we should start a lighting fixture self help group?
ReplyDelete