Monday, April 8, 2013

N scale church from scalescenes plans

Over the past week David and I have been working on an n scale model of an English church. We downloaded the plans (which include printable pieces and windows plus really good instructions) from scalescenes.com and have been working our way through it, kit bashing as we go :)

Here's where it stands as of this afternoon:


I wanted a humbler church than the scalescenes version, so I shortened the tower, simplified the ramparts and shortened the building by removing the chancel at the east end.


The download includes printable windows -- I took them to my local UPS store and had them colour copy the file onto transparency film.  They're going to look gorgeous, particularly when the church is lit up!


Look at the detail inside!  No one is going to see it, sadly, but it's there :)


Now it's time to make a whole lot of buttresses :)

Looking at the level of detail included inside these models, I think they would really suit dolls house hobbyists into 1:144 scale - all of Scalescenes models are English n gauge, or 1:148.

Tuesday, March 26, 2013

Station buildings in n scale

Who knew that micro scale could be so much fun?

Here are two of the three buildings on the platform at Grosmont Station.


Sunday, March 24, 2013

1:144 scale ticket office

Well, here I am, scratch building a 1:144 mini! Isn't it interesting the paths our lives take us down? :)

I'm using sheet styrene molded to look like clapboard, plus tiny windows and doors by Tichy Trains.

And I'm thinking about making tiny hanging flower baskets so I think I'm officially round the twist ...

Wednesday, March 20, 2013

Some nice things in the post!

My husband and his brother are paneling the ceiling in our real living room ( I wish it could go as quickly as things can in dolls' house scale) so I haven't been able to do much mini-ing.

But the post has brought some lovely things. I received my order from Sue Cook today - more on that soon. My new front door is going to be amazing, and I'm really glad that I rethought the approach I was going to take.

And I got these brass jewelry findings from a seller on eBay - they're little beehives or birdcages, just over an inch high. Whatever they were meant to be, they're going to be painted black and turned into lanterns for the attic. I think they may actually look quite convincing ...

I've been working hard on sorting out my workroom upstairs, and last week the kids and I moved their dolls houses up there. It was nice getting some order imposed on the chaos there!

Sunday, March 10, 2013

N gauge buildings from kits - engine shed

Okay, so this isn't dollhouses, but it is scale modelling. My husband David and I are working on an N gauge railway layout based on the North Yorkshire Moors Railway.

N gauge varies a little in scale, from 1:144 to 1:160.

David has finished laying the track and it's now time to start planning and building the structures.

We ordered an assortment of building kits by Metcalfe. These are card kits, die cut and scored for easy construction.

And the construction is easy! We spent a pleasant afternoon working on the engine shed for Grosmont Station, which will be two Metcalfe kits connected end to end.

Here are some photos - more soon!


Thursday, March 7, 2013

More bricks!

Today is Knitwits and I hope to post some photos of the kids' projects, which are coming along so well.

Here's the first bay of the main house this morning - almost done!


Tuesday, March 5, 2013

Bricks coming along on dollhouse front!

Yes, it takes a long time to apply individual bricks - this is the result of two evenings' work.

I'm mixing the excellent brick Versi Slips from Richard Stacey with two other colours home made from sandpaper - a paler and a darker.


Sunday, March 3, 2013

Second front door on William and Mary House

On Thursday I cut the second door front for the dolls' house, and cut out the window openings. I've decided to go with two windows for each of the rooms, partly because it's more typical of the period and partly because it'll cut down on the number of bricks I have to apply!

I added the quoins and have just now finished making and painting the waist.

It gets more like a real dolls' house every week!


Tuesday, February 26, 2013

Four poster bed in William and Mary House

Here's the bed in situ in the bedroom of the William and Mary House -- I really love how it looks, even before I make and embroider the hangings! The pinkish velvet-covered mattress came with it, and looks just fine, actually -- goes very well with the wallpaper, at least :)

The chair is a Bespaq I picked up cheaply on eBay -- so typical of the period.


And I finished the strip of stonework for along the front of the main house. David bought me a triangular file and I found that did an excellent job of delineating and deepening the bevels between the stones.  Next step -- cut the right hand front door!


Monday, February 25, 2013

Tulips (full scale) and 1:12 four poster bed

Today felt quite a lot like Spring in Nova Scotia -- warm sunlight and a brilliant blue sky almost fooled me into thinking Spring was here already. It made me buy a bunch of tulips at the grocery store; my first of the season :)

I think I love this so much because it reminds me of the 17th century love of tulips :) I get to have tulips all year round in the William and Mary House!


I finally decided on the four poster bed to go in the bedroom of the WAHM: this whitewood (or barewood) version, by Street Ahead, which I bought through UK dealer Minimum World. Within a week or so after ordering, it arrived and was ready to be stained.


 I have some touch ups to do (I need to even out the tone in places), and I have to varnish it, but imagine this hung with crewel work and with crewel bedding ...


Monday, February 18, 2013

Tony Knott pewter in miniature

Having heard that English pewter artisan Tony Knott was retiring, I ordered these pieces while I could still get them :)


The three tankards are for the Pub, when it gets built (sometime in the never-never of planned-but-unstarted projects) and the jug and goblet are for the William and Mary House.

Friday, February 8, 2013

Stonework waist

Needing stonework waists for my house, I decided to make a band of "stones" out of a thin pine strip.

I used a long quoin and marked off the strip into lengths. I incised a v shaped groove to separate each stone and then beveled the top and bottom edges with a craft knife. I think I need to get some decent carving tools -- this is fun!

I then coated the strip in limestone modelling dust.


This door is now ready to hang -- maybe later today?

Thursday, February 7, 2013

Knole settee by Kris Compas


Kris, the settee arrived yesterday, and it's just stunning. I couldn't be happier with it!

The Blue and White room is in a bit of an uproar because of the construction going on, but this gives an idea of how harmoniously the settee goes with its surroundings :)

Folks, that's Kris Compas, furniture artisan extraordinaire!

Wednesday, February 6, 2013

WAHM roof on! Woo hoo!

Darling David, in spite of not feeling very well, helped me put the hinged front of the roof on today!

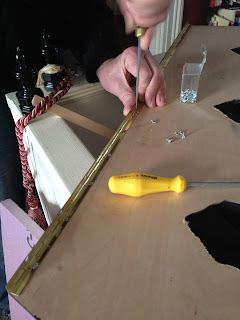
Piano hinge screwed to the front:


And with the other side screwed to the ridgepole ....


... it now opens and shuts!


I'm so happy :)


Monday, February 4, 2013

Knit Wits make progress

We had a great day on Thursday! Ruth made some serious headway in finishing her fireplace, and Esther zipped along with her Tudor house - putting in the dividing wall upstairs and making the stairs to the attic.


Monday, January 28, 2013

Chimneys on and front of kitchen wing almost done

I glued the big chimneys on to the WAMH yesterday -- I still have to do the lead flashing round the base, but they add so much to the look of the building! I do love the extra height of the chimney pots.


And I pushed ahead with the brickwork and finished the bricking on the kitchen wing front. I have to make and finish the "stonework" waist of the building, which will be applied at the top of this wing and around the middle of the whole building.

I decided I wanted a little detail for the tops of the windows, so I used three of the quoin stones above the lintel of the windows to add some interest.  I think this motif, repeated across the facade of the house, will look quite nice.


I'm almost through slating the front of the roof, and then the roof will be well and truly done!

Sunday, January 27, 2013

Sandstone modelling dust and starting the brickwork for the front

So yesterday afternoon I started playing with the sandstone modelling dust from Richard Stacey. It's actual stone dust, which you mix with PVA glue and water. The instructions suggest mixing equal parts of water and glue and then experimenting with the amount of dust you add to the mixture.

I found if I added too much dust it got weirdly gloopy -- too little and there's not enough texture. I ended up putting on many fairly thin layers and building up the texture on my window frames and the door surround. There are still places where things glooped but by and large I'm pleased with the results especially after I sanded down some rough places.

My door surround used to look like this, back in the day when I was going to have grey stone trim:


Since I'm changing all my trim to sandstone, I reworked the door finish. I used coats of the modelling dust and PVA/water mixture, but because this was being applied over the dark grey, it wasn't matching the window surrounds, which had their sandstone applied over the raw wood. So I cheated a bit, and touched up the colour with paint :) Now it looks like this:


 I also made a start on the kitchen front, having applied my quoins. I started with the bricks, and really love how warm this is looking!


Saturday, January 26, 2013

Janet Granger's January sale is still on!

I just bought some silk gauze and a kit to make an embroidery on a needlepoint stand from Janet Granger, who has a sale going on.


If you've ever wanted to start doing 1:12 scale needlepoint, this is a great chance to pick up a kit for less. I started with a cushion kit from Janet, and haven't looked back :)  She also has kits on silk gauze for people who want more of a challenge!

And her postal rates are great -- my order is shipping for 1.50 GBP to Canada.


Chimney pots and sandstone quoins from Romney Miniatures

I'm so excited!  My order from Romney Miniatures in the UK has arrived at lightening speed and it's just perfect.

First of all, I ordered six large chimney pots for the main chimneys on the WAMH.

I applied a layer of tacky glue to the tops of the chimneys and then a layer of spackle/crack filler (because it was clear the spackle wasn't going to stick to the wood on its own). I applied glue to the bottom of each chimney pot and stuck them in place into the spackle, and then smoothed things out a bit.


I still have to paint the spackle grey to resemble the bed of mortar it's impersonating, and I need to blacken and soot up the pots themselves, but I'm so pleased!


And my quoin stones also arrived. These are separate sandstone slips, with bevels on three sides, and are sold in packages that will cover roughly 1 m in length.  They're really beautiful and are going to make this house pop!


Now to figure out how to use the sandstone modelling dust I have!

Thursday, January 24, 2013

Knole settee for William and Mary house!

The amazing Kris Compass has done it again. She's created the most perfect Knole settee for me, to live in the blue and white room in the William and Mary House, and I can't wait to see it in person!

These photos will give you some idea of her exquisite work:


Thank you, a million times, Kris! You're a true artist and a wonderful person with whom to collaborate.

You can visit Kris's amazing blog, 1 inch Minis, which has tons of tutorials by the artist herself. You can also check out her page at CDHM Miniatures, where she posts items that are ready to be sold and takes commissions.

Sunday, January 20, 2013

Front of roof coming along

I'm so pleased with how the roof is progressing. I work at the slating a bit every night!

I'll be away from home for the next five days, so I hope to get caught up on some of my neglected posts :)


Friday, January 18, 2013

Much to catch up on!

Happy New Year! I've been doing lots of mini things and taking photos but they just haven't made it as far as blog posts :). I'll catch up soon!

I wanted to get the ball rolling just by telling you that what I hope will be the last lot of slates from Richard Stacey has arrived. I spent a couple of hours this afternoon cutting a batch of matching slates from emery paper, and I think I've now got enough to finish.


Related Posts with Thumbnails