Tuesday, August 31, 2010

Some suggestions about bi-pin bulbs

I hung three chandeliers yesterday, in a fit of electrical activity :) Sometimes doing wiring is really frustrating, but the 12v gods were with me for some reason (in spite of a very big stupid thing I did).

For anyone who is confused about 12v dolls' house lighting (I certainly was) I thought I'd just give a little breakdown of the kinds of lights I've encountered myself.


I bought three chandeliers for the ground floor -- two four armed ones and one large six armed one.  The large one uses lovely slender little bulb/candle units that screw in. The smaller ones use bi-pin bulbs.  I have another kind as well in the house -- the wall sconces in the dining room use screw-in bulbs.

1:12 scale lights that use the screw in bulbs seem to be cheaper and less in scale (especially for fixtures mimicking candle light)  than the others because the bulb is quite large and very bright, if you're not using a dimmer.   The bi-pin bulbs and the bulb/candle units are usually more expensive but worth the cost because the light is generally softer and the flame looks more in proportion.

The screw in ones, whether the bigger bulbs or the daintier bulb/candle combinations, are pretty easy to work out.

But when I bought my first fixtures with bi-pin bulbs (the Tudor floor lamp and Tudor chandelier) I was a little nervous about installing the bulbs.  How short should I cut the wires? Should I cut them at all?  The whole thing looked very fragile to me.

So I took a few photos while setting up my bi-pin chandeliers just in case anyone else feels a little diffident or nervous about bi-pin bulbs :)

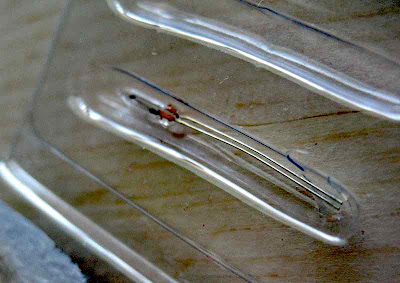
The chandelier is in the photo above.  Here's a bi-pin bulb, with a correctly trimmed wire:


Man, they're small!  They made me nervous because they are so small, look so fragile and the wires have to go into very teeny tiny holes :)

Hold the bulb, gently and slightly separate the wires and line them up with the holes in the fixture:


Gently press the bulb in.  If the wires are not too long, straight and lined up with the holes, it will go in very, very easily.  That's it!

Usually when you buy a fixture with bi-pin bulbs, the bulbs are packaged in a little bag taped to the wire.  These bulbs already have their wires trimmed to length.  If you're replacing a burned out bulb, then the bulbs in replacement packages need their wires trimmed before you can install them.  I had temporarily misplaced one of the packets of bulbs that came with my chandeliers (lord knows where it is), so I was glad to have a couple of spare packages of bi-pin bulbs at hand!


With any kind of electrical thing -- fuses and bulbs especially -- always buy lots of spares :)  You won't regret it!


The end of the wire is stuck down in these replacement packages.  You can either cut the bulb unit out or pull gently (on the wire, not the bulb) until the wire releases.  Then trim the wire to about 1 cm long (a little over 1/4")  If you've left it too long, then you'll notice the bulb won't go all the way in.  I confess I don't know what happens if you trim the wires too SHORT (and how short is too short for the bulb to work) -- I should be scientific and experiment with that!


And here's the chandelier in place, showing one of the few downsides to bi-pin bulbs -- they will bend!  See how some of the flames look as if a strong breeze is blowing from the right?  :)  Before you photograph your lovely light fixtures, do make sure that all your bi-pin bulbs are upright!

I'm busy taking some better photos of the light fixtures (most of the ones I took yesterday are rubbish), so more tomorrow, I hope!

Monday, August 30, 2010

Final stages and first floor glued!

Woo hoo! I'm so excited!

I finished up the last things I absolutely needed to get done before gluing on the first floor.

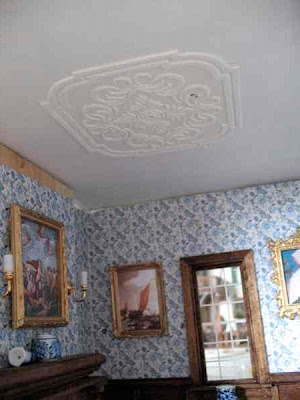
1. Ceiling roses/decorations. I added a large ceiling rose to the hall and a combination anaglypta/small rose to the parlour. To keep the holes lined up, I used a wire which worked very well:


2.  A frieze around the top of the wallpaper in the Parlour, to hide the fact that the wallpaper doesn't go all the way to the ceiling :)  I used a section of the anaglypta -- it's not perfect (more Regency than George I :), but it does finish things off and it was cheap and easy!


(I'm amused by the way the light comes through the wall in the Parlour :)  Once there are bricks on the outside of the foam, of course, things will be a little less glowing :))

3. Finally, I glued on a beam on the kitchen end wall to support the first floor at that side:


And so, this morning, I glued on the first floor!

With the ceiling on, now I can finish some of the downstairs trim, like the "crown moulding" in the dining room.  I used a small 1:1 moulding with an embossed egg and dart pattern.  Here it is, unfinished, being fitted to size, with mitred corners:


And here it is stained, and glued into place:  (the only place it's not glued to the ceiling is the front of the chimney piece, because the whole chimney piece is removeable so I can fix any lighting problems that may develop).


Now I can install all the lighting fixtures and wire them up!

Sunday, August 29, 2010

Hall window

Just a few things I want to clean up before I put the roof on the main floor, and the hall window is one of them.

I cut out pieces of rather wide tongue depressor sticks to make a lining for the window cut out in the foam, and I stained them.


I glued them into place inside the window opening.


Then I constructed a simple frame out of  odd bits of wood -- these overlapped the edge of the window so that they would stop the "glass" from moving forward.


I trimmed the foam so it was neater, then cut a piece of acrylic to fit the window hole and made panes using 1/16" self-adhesive model striping and then fitted it into the hole.


And it's done!


I've also been working on what I'm using for crown moulding, and I'll show that in a later post. I also MUST do my 200 follower giveaway, or it'll be 250 lovely followers and I will be consumed by guilt :)

Thursday, August 26, 2010

Front door of WAMH

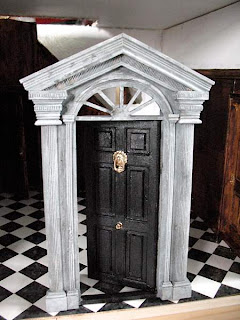
I'm a long way off from being able to install the front door, but I picked up a ready-made unit a month ago from an eBay auction for a very good price, and it's been calling to me ever since, "make me pretty ... make me pretty ..." :) (It's the Windsor model front door by Dijon, in case you're curious).

I did the faux stone using a base coat of a neutral grey (neither warm nor cool) and then added scumbled layers of lighter, darker and warmer greys.


The hardware I chose was brass, made by Sussex Crafts.  I really love the detail on their work. 

It's very "Number 10, Downing Street", isn't it?  :)


And here it is in front of the Hall -- roughly where it will be once the house is completed and I've made up and attached the front panels (heavens knows how long it will be before that point is reached!)

First celing decoration and light fixture

I bought a roll of anaglypta wallpaper border from Home Depot (most North Americans know anaglypta as dimensioned wallpaper) to use for ceiling decorations, as the raised designs mimic decorative plaster work quite well.  I cut out the central motif and gave it a go this morning in the dining room.


Last night I painted the "ceiling" side of the plywood flat white.  With the ceiling on in the correct position this morning, I drilled holes in the centres of each of the four rooms.

I made a hole in the centre of my ceiling decoration.  I then flipped the plywood over so the white side was up and aligned the hole in the decoration with the hole in the dining room part of the ceiling, trying to keep the whole thing square to the sides of the plywood (and trying to remember which part of the upside down ceiling was the dining room!)


When I flipped the plywood over and had a look at the dining room from below, I realized my mistake!  I had estimated the centre of the room by the distance between the two walls -- I should have used the right hand wall and the edge of the chimney breast!


It may be centred in the room, but it isn't centred over the table, and that would drive me nuts!

So I peeled it off (I'm glad I checked right away, while the glue was still wet!) drilled a new hole and moved the whole gubbins over about an inch :),.


Then I just had to see what one of the chandeliers looks like, so I just stuck it up temporarily:


Wednesday, August 25, 2010

First floor cut to size

At this point, it starts looking more and more like a proper house:


I cut a piece of 1/4 inch plywood to size (about 15 7/8" deep and 47 1/2" long), and cut out the stairwell. It's not glued on yet, of course (I still have a lot of finishing to do) but it gives the general idea.


The rooms look so different closed in! Here's the kitchen:


I have a slight problem with the first floor -- the grain of the plywood runs the opposite way (widthwise) to the ground floor (lenthwise), which means that I'll either have to:
  1. score the first floor floorboards with the grain as usual, and have them running parallel to the ground floor's beams (visible in the kitchen)
  2. score the first floor floorboards with the grain, and change the beams in the kitchen to run lengthwise.  This will make the floorboards in the dining room and parlour look a little odd :)
  3. try to score the first floor floorboards against the grain
  4. use commercially-made scale floorboards
 Hmm.  What do you think would be least noticeable?

And what should I do for light fixtures in the kitchen?  If I'm going to have a ceiling fixture I need to plan for it, because the space above the kitchen is going to be totally closed in.  Maybe one of Ray Storey's Tudor lanterns?

Monday, August 23, 2010

Ground floor of WAMH glued!

It's all glued up now -- lots still to do on these rooms, but the structure is done!  I added the wall between the dining room and hallway, glued and taped it in place and let it set.  Then I glued the stairway unit in place (after doing some last minute patching on the tile floor -- needed to add a couple of tiles because my initial pattern was not perfect).  Then I glued the final interior wall in place and taped everything snug.


Here's the dining room as it stands today:


Here's the hallway.  I love the clock here (it's the House of Miniatures William and Mary clock kit that Eva put together beautifully), and I am still in love with the Masters Miniatures Charles II side chair.  I think it's one of the most pleasing miniature things I own :)


And here's the Parlour:


Here's a close up of the fireplace and overmantle:  I had to use a couple of coats of white paint on the overmantle until it was white enough to match the plaster fireplace :)  It was sort of ivory to begin with ...


Now it all starts over again, but this time for the first floor!

Sunday, August 22, 2010

Ground Floor of WAMH going together!

I've been busy the last couple of days :)

I did some more work on the back wall of the ground floor. Here it is, out of context, and in front of the castle kitchen.  Man, is my workroom messy!


Here's a view of the rooms before any gluing has happened -- my last "dry fit" run.


Here's a better view of the hallway.  The panelling isn't finished, but I'll do that when it's all glued up, because I have to fit some baseboards in situ (because of the thickness of the tile floor, I need to deal with that extra depth.)  I love this room -- it's the hallway I've always dreamed of having.  Before I glue the stairs into position, I need to paint the wall inside  the closet black, or something.


And here's a better view of the parlour.  The wallpaper still looks lumpy because it hasn't really dried totally in this picture (although I'll admit, there ARE some lumps!)  Again, I'll finish the panelling in situ.


Yesterday evening, I started gluing the ground floor together, which was so exciting!


I glued the left end wall on first, holding it in place until the glue caught -- then taping it down.  Then I glued the back piece on.  This was more difficult because it's 4 feet long, and I had to use a lot of tape and weights and so forth to keep it in contact with the base and left wall until it set.  Then I glued the right hand end on.  The foam glues really nicely to the plywood, and everything is pretty solid.  There's some wiggle in the foam, of course, but every wall and piece I add from now on will make the structure more rigid. 

I knew I'd have a few gaps to fill once I'd glued things together -- in the kitchen because there's a dent at the end of the back wall there, and in other rooms because my panelling isn't exactly precise :)

Here's the fix in the kitchen, where I'm going to have exposed beams anyway.  It's a little piece of 1/4" square balsa, painted first, that covers the gap in that back corner nicely.


I glued the first interior wall in place, between the kitchen and the dining room. In the dining room, there's a gap at the back corner of the panelling. I glued another bit of 1/4" square balsa -- I do need to touch this up (or put a screen in front of it :) since I did it in the dark and it's not great! (When will I EVER learn -- don't do stuff in the dark!)


And here's the right hand end of the ground floor.  I cut the window hole in the hallway's back wall before gluing.  The other windows I've used so far have been standard Houseworks ready-built ones -- this one I have to build myself -- yikes!  We'll see how it goes ... :)


After a couple of months of messing about with this structure, knocking over walls and so forth, it's very satisfying to touch it and have it stay in place!  I've got lots of patching and bodging up to do, but this is a really happy day for me and the William and Mary House!

Love to you all,

Nina

Saturday, August 21, 2010

Kitchen fireplace


I finally made the brick lining for the kitchen fireplace!  It's going to be largely concealed behind ovens and grates and things, but it's done.  The hearth is just a piece of peel and stick floor tile which I'll paint to look more rustic, but it's covering up some ugly stuff right now, so I thought I'd just leave it in place for the photo :)

I need to dash out to my local model shop and pick up some more thin balsa strips to finish the panelling in the parlour, then I think I can glue the whole bottom floor together!  Woo hoo!

Friday, August 20, 2010

Parlour fireplace, panelling and wallpaper

The girls and I did some good work on the WAMH yesterday! This is just a quick post to show you what Fred worked on.

She painted the wood panelling a dark grey-blue (it's Montpelier by Benjamin Moore) then glued on the scenic wallpaper. She did a great job! 

This pattern is SC-Clasico by Les Chinoiseries, a Spanish company which makes and sells the most divine wallpapers and fabrics. I cut the border pieces off (I may use them in the blue and white room) and I really like the way it looks with the greyed blue of the panelling. 

The panelling isn't done, of course -- I've just got the chair rail on, but I'm going to do mitred rectangles of moulding in the centre of each panel.  Tiddles worked on the panelling in the hallway, and I've done some work on the wall opposite the one above, but my pictures were lousy :)

Talk to you soon!

Nina

Wednesday, August 18, 2010

William and Mary House August update

Here's where the WAMH stands as of this afternoon:


Kitchen: Nothing really changed here, except I added the door handle to the back door.  Still have to make brick lining for fireplace.


Dining Room:  I added the 1648 painting of a sailboat, and you can see that I have the chandelier all ready to hang :)  I finished the right hand wall, which you can't see very clearly in this photo. None of the walls has been glued into place yet.


Hallway:  The left hand wall is mostly done -- high panelling with the wall painted white above it.  I made the floor while I was invigilating a student's exam -- it took every bit of 2 hours to complete!  I'm thrilled with how it worked out, though, and can recommend Traditional Elegance Tiles's Marlike floor tiles to everyone. 


Parlour:  This will be the parlour's fireplace. This room will be half panelled and have scenic wallpaper above the panelling. This is one of two lovely fireplaces I bought from The Miniature Fireplace Company (part of Dovetails).  The other, the Classic, is for the bedroom. Highly recommended.


Fireplace for Blue and White Room: I adore this piece!  Look at the detail on it.  It's truly exquisite and came with the hearth (I bought it through an eBay auction which included the hearth).  It's by Plastercraft Interiors in the UK -- their eBay shop is periodmouldings.  I recommend them highly, too.

So much to do!  I've cut the wall that will go between the Hall and the Parlour -- now I have to finish it on each side.  I have to cut out the window holes in the back wall, and make the window for the Hall.  Then everything can be glued in place and the ceiling put on!
Related Posts with Thumbnails