Showing posts with label Camp Mini Ha Ha. Show all posts

Friday, November 30, 2012

Camp Mini Ha Ha featured on CBC radio

During Camp Mini Ha Ha this year, Jackie Torrens shared two days of our work and celebrations, and her piece on miniatures and miniaturists is being broadcast on CBC tomorrow.  

But you can hear it via the CBC website any time you like :)

Every Fall, for more than 10 years miniaturists from Canada, the US and the UK have gathered in Annapolis Royal, Nova Scotia.
They spend 5 days building miniature replicas of real-life objects.... at a place they call Camp Mini Ha Ha.
It's the brainchild of three people, Debbie Parrot and Sheryl Hartland from Nova Scotia - and Marcy Cumberland from the US.
About 30 campers go every year, and while men are welcome, so far most of them have been women.
Writer, actor and regular CBC contributor Jackie Torrens, has a thing for people whose interests are off the beaten path.
We sent her to Mini Camp for two days....and there she found that big revelations can be had, even in a world so small....

I think it's a great piece -- Jackie was an amazing explorer of our mini world got us all discussing and talking about things. 

Camp Mini Ha Ha is an annual camp for miniaturists in Nova Scotia, Canada.


Monday, October 8, 2012

Camp Mini Ha Ha crofter's cottage -- at home

Here are the photos I took this morning of the crofter's cottage project I completed at Camp Mini Ha Ha. There are a few things that need doing (I want to plant a tiny garden outside, the door needs some handles and I want to touch up a few things) but it's mostly done.


Wednesday, October 3, 2012

Final day of Camp Mini Ha Ha -- using LED lights

My last day at Camp was Sunday, as I decided to drive home to my man and cats at the end of the evening's events (most people stayed the night and left in the morning).
The overcast view from the main building over the Annapolis Basin of the Bay of Fundy.

Sunday was my wiring day.  I had worked on my light fixtures earlier in the week, but this was the day to wire everything together.

First of all, I tested each fixture, then I made the necessary holes in the structure with a bamboo skewer and started attaching fixtures: there are four lights on this model: coals, reflector sconce, candlestick and outside lantern.
The LED lights we used have built-in resistors and wiring, making them super easy to use
 We had a wiring kit supplied by Grandpa's Dollhouse, the Canadian distributor for the LED light sets made by Evan Designs.  The kit comes with five wired LED lights, already equipped with resistors, a 9 volt Battery Snap with pre-attached switch, two pieces of shrink tube for covering your connections -- Liz and Wayne of Grandpa's Dollhouse also supplied the 9 volt battery.

For the two fixtures that were placed high on the walls I needed to lengthen the wires to reach the base so I could attach them to the wires coming off the battery.  It's easy enough to do, provided you remember a couple of things:

Unlike 12 volt round wiring (the traditional stuff used in dolls houses) where it doesn't matter which wire you connect to which wire, LEDs have positive and negative wires, so one wires black to black and red to red.  You can extend the length of the wires coming from the bulb/resistor with ordinary white round wire, but you don't want to cross wires.  The easiest way to do this is to separate the length of round wire entirely, so you two lengths of single wire.  I connected one length to the red and one to the black coming from the LED and resistor, and then marked the one coming from the black wire with a bit of black paint at the end.

Ugly gouges on the side wall where I hid the wiring extension needed for my wall sconce.
You can make your connection a number of ways: after twisting the wires together, you can either solder them, shrink tube them or cover them (keeping the wires separate) in electrical tape. The latter is ugly, as you can see above, but I didn't have my soldering iron with me and I was running out of shrink tube!

All the wire gathering on the bottom of the model.  On the right, under the manky masking tape, is the 9 volt battery.
I hollowed out a place for the 9 volt battery on the bottom of the foam base.  With all the wires coming from the fixtures, I then simply connected all the black wires, covering the connection with a shrink tube and did the same for the red wires.  (Remember to slip that shrink tube onto the main wire first!)

Then, it was time to flick the switch!


That's my favourite moment of all in mini making -- the moment when the lights go on!

Having finished my model as far as it was going to go, I took a moment and snapped some shots of the other projects near me:

The interior of Mary-Anne's Tuscan wine and tea shop, where there has apparently been some kind of rumpus!

The exterior of Gnorbert the Gnome's home by Myra -- best front door ever!
And Gnorbert's cosy room inside.  Love that window!

Trina's beautiful Garden Shop, which manages to combine elegance and whimsy.  Look at the bird feeders on the fence!
And the inside of the shop, in progress :)

Thank you to all the wonderful campers I met and to the great people who organized this event.  I think I'm a lifer now, and I know I'm an Idjit and I intend to return every year!  I returned home with renewed mini-ing zest, and can't wait to get started on the WAMH again.

Saturday, September 29, 2012

Saturday at Camp Mini Ha Ha -- work continues, plus sale and AUCTION!

I am over the moon -- so happy and excited! I won the most beautiful things in the auction this evening, and can't wait to tell you all about it ...

My piece is gluing up and I've added the wood trim.  Tomorrow, I landscape!  One of the things I finished today was this rather rough little grate and stove for the crofter's cottage's fireplace -- it's all made from mat board with a Tic Tac bed of coals :)


We all continued work on our projects today -- the pieces continue to astonish and delight me.


Our British camper, Anne, has made a very creative inside/outside scene using a turntable.  Really ingenious.

Nancy is famous for sticking most closely to the prototype project :)  I love the black trim here.

Elizabeth is making a stately wizard's room ... the outside ...

... and the inside!

Love Sherry's wainscotting and trim on this one.

This is Kelly's dark and mysterious house, which she says will be full of trees.  Sounds fabulously fairy-tale like.

Debbie P's version has lots of windows.

This afternoon was the open house, when non-participants are allowed to come in and see what we're up to.  I had a table in the Sales Room from which I sold mini books, book kits, furniture and decorated china.  I actually sold enough to be able to go shopping and participate in the auction in the evening!

Here are some of the lovely things I bought this afternoon: paper flowers, cutting boards (which I'll turn into something special), an LED battery operated table lamp for my Mum's birthday (and her room box), another pussy cat, a Bonnie Lavish tulip kit, a wonderful ham for the William and Mary kitchen and a deer's head for the castle.  I also picked up two pieces of pottery by Joanne Shaw to add to my pottery collection -- like all her work they're dead in scale -- fine, fine work.


And the instant I walked into the Auction room (which helps raise money for Camp Mini Ha Ha's continuing existence) I fell in love with one lot -- a pad of graph paper, a dark green 1:1 scale mug with a mini theme ... and a pair of sterling silver candlesticks by Canadian silversmith Greg Matuskovsky, who is carrying on the work of his late father, Vladamir Matuskovsky.  When I say I fell in love with them, it's not an analogy -- something "pinged" in my heart.  I don't have a lot of money, but I had made enough this weekend, thanks to so many generous campers, and this was the one item I wanted to get.

And I did!


I took this picture with my phone camera which doesn't really have a macro lens, but it'll give you an idea :)  They are about an inch and a half tall,  with exquisite detail and are in my favourite style (square bases with barley twist bodies).  I am ECSTATIC!  Thanks so much to Betty who generously donated it to CMHH's auction and to Debbie P. who let me win it :)

Second day at Camp Mini Ha Ha -- structures!


This is the model project: outside ...
And inside!
Here are some photos of the model project which is itself a group effort.  Samm Brockhurst designed and made the kits of builders foam for the structure and is helping us with windows and doors.  Janet Harvey designed and styled the interior and is teaching us to make the chair and window treatment.  Adrian Cooper has done the exterior finish, foam carving and landscaping, all of which she is teaching us.  And Wayne Dieleman, husband of Liz, the proprietor of Grandpa's Doll House, prepared the lighting kits and taught us the basics of LED lighting.

I may have mentioned that this is a creative group of people. Here are some examples of how supportive the instructors are of individual creative vision and why this is a really special environment.

Walking around the work room on Friday I snapped a few shots of some of the various versions of this scene:

Mary Anne is making a Tuscan wine and tea shop!
Kelly is making an upscale hobbit hole.
Shelley's also making a hobbit hole, with extensive landscaping!
And here's the inside of my cottage so far!

On Friday I worked on light fixtures: an outside lantern, a candlestick and candle and a wooden wallsconce with reflector.  I found the PERFECT bit of stuff for a candle reflector, by the way -- it was on the freebie table of craft supplies and is one of those ROM (Royal Ontario Museum) tags they give you for the day to show you've paid your entrance fee-  Couldn't have been better!


Janet taught us a simple method for making curtains that look as if they have weight.


I finished a pair of chair I'd brought along -- the one of the right is just stained and the other was stained and then touched up with acrylic paint.


We also had kit sales and a lovely woman who is making a CBC Radio feature about the strange and wonderful world of miniaturists!  Some very interesting discussions were had late last night about the nature of our hobby/obsession and what it says about us!


Thursday, September 27, 2012

First day at Camp Mini Ha Ha - start of project

My workspace in the project room!

First full day of Camp started bright and early with breakfast and our first bag full of goodies made by our fellow campers!)  Then we were right to work on our project.

Our project is a corner scene with the theme of "Inside and Outside".  One of the things I really like about this camp is that we're all encouraged to go our own directions with the basic layout of the project. There are quite a variety of scenes being planned by the participants: English cottage, fairy house, hobbit hole, gardener's shed, Tuscan house and many more!  I decided to try a crofter's cottage with a stone floor and stuccoed exterior.

Lots of workshops today: wiring (with LEDs), various faux finishes (including bricks) and paint techniques. Lots of good advice: I learned about an excellent glue: Crafter's Choice, which dries clear and stable (unlike Tacky Glue, which continues to have some give to it).  Nice stuff, and amazing for work with foam.

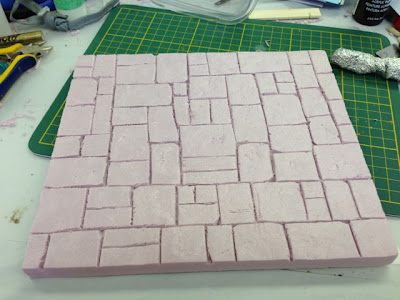
One of the things I learned today was how to carve the 9/16" thick builder's foam we're using as the basic building material for our structures.

Draw flagstones (or rough, uneven shaped stones) in pencil on the foam.  This will be my floor, but of course you could use this technique for walls.

With a very sharp Olfa cutter or other small craft knife, cut v-shaped grooves for the lines between the stones.  Carve some of the stones a little uneven (as if a corner is chipped off, etc.).

Next, add texture.  We were shown how to use a rolled up, crumpled sheet of aluminium foil to texturize the foam surface.  I also added wear in the centre of the stones with various tools.

And at the end of the day today I had the basic framework of my crofter's cottage roughed out.

I've increased the size of the inside floor, and moved the window from the end wall to the door wall in order to make room for a fireplace.  I changed the end wall to incorporate a double thickness of chimney. 
I've left only enough room on the outside for a few climbing roses! Some people have made the garden area much, much bigger than the inside, and some have added extra baseboards for more garden!
I also got my mantlepiece done and painted (I made the large beam for the mantle from carved foam, which I'd never tried before), plus my door and window.

Tomorrow we learn how to upholster a chair and make draperies -- I probably won't use those in this project, but I am really looking forward to learning how to do them!

Wednesday, September 26, 2012

Camp Mini Ha Ha -- first evening

This is one of my favourite room boxes on display in the Exhibit Room:  it's called "Fixer Upper" and really reminds me of our house when we started ripping it apart :)  It's even got layers and layers of wallpaper over lathes!

I write this from the Annapolis Basic Conference Centre (the former Cornwallis Armed Forces Base) where I am ensconced in my very nice room after a busy day, a long drive and a few hours of exposition and hilarity :)

I am pretty much overwhelmed by the energy and talent of all these lovely people! Tonight was a bit of a blur -- looking at the exhibits in the Exhibit Room, trying to learn names, trying to pay attention and absorb the culture I've just dropped myself into.  I'm pretty socially awkward in large groups where I don't have a leadership role, so I generally cope by going quiet and trying to work out who's who and what's what ...

I think this is a lovely group of lunatics with a long shared history :)

After the announcements and introductions (there are about 35 of us, mostly from Ontario and Eastern Canada, with one, lone, American -- Mary Anne, I and and other woman are the only newbies) we had the draw for the first night's Giftie.  On each of the five nights of Camp, everyone who has brought a Giftie gets to participate in the gift exchange.  Seriously, the standard of work here is extremely high all around -- I would have been honoured to receive any of the items.  To my delight, I was chosen to receive this:


Isn't it stunning?  It's a handmade window with real lead and I adore it!  It's by Kelly Pinheiro, and I can't wait to incorporate it into something ...

I just figured out that in my mad rush to get everything packed and in the car I forgot the tube and mask for my CPAP machine, so we'll see what kind of sleep I get.  I have to be up very early (breakfast is at 7:45, I believe, with the first session of the day starting at 8:30 -- NOT opera hours :)) so I'm going to turn in now.  Goodnight, and more tomorrow!

Tuesday, September 25, 2012

Frantically getting ready for Camp Mini Ha Ha!

Annapolis Basin Conference Centre - can you tell it used to be an army base?  :)

Oh dear.  I seem to have procrastinated, and now I leave for Camp Mini Ha Ha tomorrow, and am I all packed?  NO!

(On the plus side, I have some book covers ready for download -- you can buy the downloads on this page :))

So today will be a whirlwind of preparations, I guess -- I wonder how many things I'll forget? I've been sent lists of stuff to bring and tools I'll need for the workshops, so it's all very organized in one way (on their end :)) but I am just not ready!

So, off to make some copies and put my tools together -- have a great mini day, and I'll be blogging from Camp!


Saturday, September 15, 2012

Another sampler!

I'm stitching up a storm!  I finished everything but the background on the Adam and Eve sampler yesterday, and am almost done with the detail of a sampler from Pamela Warner's excellent Miniature embroidery for the Georgian dolls' house. (I wanted to make good use of the bit of silk gauze I was using for the Adam and Eve sampler, so this one is also on 40 ct.)


 It's a very pretty piece, sprigged with potted plants, and featuring a Georgian house.  The original was signed Sarah Stuart, 1798.  I've changed some of the colours, and I'm very pleased with it!

I want to have a few pieces to take with me on a business trip I have next week, so I can just stitch background and not have to worry about counting a chart :)

Related Posts with Thumbnails