I hung three chandeliers yesterday, in a fit of electrical activity :) Sometimes doing wiring is really frustrating, but the 12v gods were with me for some reason (in spite of a very big stupid thing I did).
For anyone who is confused about 12v dolls' house lighting (I certainly was) I thought I'd just give a little breakdown of the kinds of lights I've encountered myself.
I bought three chandeliers for the ground floor -- two four armed ones and one large six armed one. The large one uses lovely slender little bulb/candle units that screw in. The smaller ones use bi-pin bulbs. I have another kind as well in the house -- the wall sconces in the dining room use screw-in bulbs.
1:12 scale lights that use the screw in bulbs seem to be cheaper and less in scale (especially for fixtures mimicking candle light) than the others because the bulb is quite large and very bright, if you're not using a dimmer. The bi-pin bulbs and the bulb/candle units are usually more expensive but worth the cost because the light is generally softer and the flame looks more in proportion.
The screw in ones, whether the bigger bulbs or the daintier bulb/candle combinations, are pretty easy to work out.
But when I bought my first fixtures with bi-pin bulbs (the Tudor floor lamp and Tudor chandelier) I was a little nervous about installing the bulbs. How short should I cut the wires? Should I cut them at all? The whole thing looked very fragile to me.
So I took a few photos while setting up my bi-pin chandeliers just in case anyone else feels a little diffident or nervous about bi-pin bulbs :)
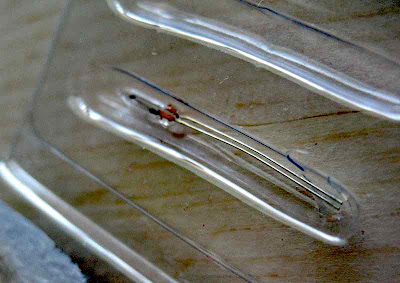
The chandelier is in the photo above. Here's a bi-pin bulb, with a correctly trimmed wire:
Man, they're small! They made me nervous because they are so small, look so fragile and the wires have to go into very teeny tiny holes :)
Hold the bulb, gently and slightly separate the wires and line them up with the holes in the fixture:
Gently press the bulb in. If the wires are not too long, straight and lined up with the holes, it will go in very, very easily. That's it!
Usually when you buy a fixture with bi-pin bulbs, the bulbs are packaged in a little bag taped to the wire. These bulbs already have their wires trimmed to length. If you're replacing a burned out bulb, then the bulbs in replacement packages need their wires trimmed before you can install them. I had temporarily misplaced one of the packets of bulbs that came with my chandeliers (lord knows where it is), so I was glad to have a couple of spare packages of bi-pin bulbs at hand!
With any kind of electrical thing -- fuses and bulbs especially -- always buy lots of spares :) You won't regret it!
The end of the wire is stuck down in these replacement packages. You can either cut the bulb unit out or pull gently (on the wire, not the bulb) until the wire releases. Then trim the wire to about 1 cm long (a little over 1/4") If you've left it too long, then you'll notice the bulb won't go all the way in. I confess I don't know what happens if you trim the wires too SHORT (and how short is too short for the bulb to work) -- I should be scientific and experiment with that!
And here's the chandelier in place, showing one of the few downsides to bi-pin bulbs -- they will bend! See how some of the flames look as if a strong breeze is blowing from the right? :) Before you photograph your lovely light fixtures, do make sure that all your bi-pin bulbs are upright!
I'm busy taking some better photos of the light fixtures (most of the ones I took yesterday are rubbish), so more tomorrow, I hope!
Stitching Update...
-
Golden Threads...
Some of the Threads I had ordered, Dear Readers, arrived promptly and I was
lucky in that I could use two of the colors for my Astr...
12 hours ago


.JPG)


